The Basics of Splitboarding
Using ski’s with skins on the bottom of them are much more efficient than snow shoes or hiking alone. The long surface area combine with the stability of the ski’s under feet make splitboarding the most efficient ways to access the backcountry on foot.
Splitboards are used to access fresh powder, rescues, research, and for exercise. Much like cross country skiing, splitboarding allows free heel movement, and with skins attached to the bottom of the ski’s to provide uphill traction. Sometimes called backcountry or ski touring, splitboarding is the idea of using your own power to access the backcountry usually on unmaintained trails. Expeditions can last from a couple of hours to a few weeks. Check out the basics of splitboarding below to get you on your way.
Essentials
Being prepared with the right essential gear for backcountry access in the winter can be the difference between life and death. Splitboarding and backcountry mountaineering can be a dangerous activity, but by preparing with the correct essentials you can mitigate these risk and enjoy years of safe, fun.
1. Splitboard
Splitboards come in many different shapes and sizes. Splitboards can even be made from home by cutting a snowboard in half and attaching the Voile Split Kit to the board. You may find yourself asking the question, “What type of Splitboard do I want or need?”
For more information on choosing between a Factory Splitboard and a DIY Splitboards check out our detailed page explaining the pro’s and con’s of each.
Read more about the different types of Splitboards available.
2. Splitboard Bindings
Splitboard Specific Bindings
There are a few companies that sell splitboard specific bindings.
- Karakoram
- Gnu – Bent Metal – Karakoram Colab
- Spark R&D
- Voile
Traditional Snowboard Bindings
Another option is to use traditional snowboard bindings with the Voile Split Kit. This gives you the feel and flexibility to choose bindings that you want with the fit you want. You are not restricted to bindings, high backs, or straps that you don’t care for. Although it’s worth pointing out that any binding mounted to the Voile Split Kit base changes the feel and flex of the binding.
Hardboot Bindings
Some splitboarders choose to use hard boots or more traditional ski touring boots. These require hard boot bindings and often use the Voile Split Kit as well. As with traditional snowboard bindings being mounted to the Voile base plates. These raise the boots from the board a considerable amount. Some splitboarders find this a desirable benefit.
K2 Kwicker
K2 makes a new version of the Clicker boot and binding system from the late 1990’s. The K2 Kwicker boots provide the patented shimano clicker system. The binding attaches to the bottom of the boot through a bike pedal type connection system.
3. Boots
There are specific splitboard boots that are made by Spark R&D. However most splitboaders use standard snowboard boots. Splitboarding puts a lot of wear and tear on your equipment.
K2 Kwicker Boots
The boots are more rigid than traditional snowboard boots, and have the connection through the bottom of the boots instead of straps over the tops of the bindings.
Deeluxe Backcountry Boots
Deeluxe make a backcountry specific boot traditionally used for splitboarding. The boots are made to a higher durability standard than normal snowboard boots, with added Vibram sole for traction anywhere.
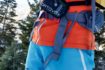
4. Outerwear
There are some tips when choosing outer. When choosing pants and jackets for hiking in variable conditions, a breathable dynamic fabric is best suited. The mountains can be a harsh ever changing environment. Weather can change in minutes, from what you though was a nice sunny blue bird day to blizzards and ice storms.
Coats and Jackets
When splitboarding you encounter all types of terrain. You need a balance between breathability and durability as well as something to protect you from the outside elements. From rain and snow to ice and rocks, you put your gear through more than a season at the resort dose in just a day splitboarding.
When choosing a coat, find something that provides a high level of breathability in both material and vents as well as water-proofing. Gore-Tex fabric is a great place to start, with some of the most technologically advanced material it provides maximum protection with breathability.
Additional features of a coat or jacket that are helpful are:
- Pit Zippers
- Articulate hoods
- Powder skirt
- Radio pocket
- Adjustable cuffs
- Plenty of pockets
- Zipper chest pocket
Pants
Choose a pant that is light weight, breathable, with zipper vents, and durable. Backcountry touring can be very hard on your gear. Pants usually take the most abuse. Pants with knee articulation is key. A softshell fabric with plenty of movement while your hiking up will keep you happy on the way up, and zipper vents and windproof breathability will keep you warm on the way down.
Most splitboarders prefer a slimmer fit to reduce bulk and abrasion from the constant rubbing of the legs, boots, and packs. Another must have for splitboard pants are gaiters. When trekking through waist deep snow, your will want your pants to stay down, and keep snow out of your boots. Wet boots can ruin any trip.
Additional features for pants we recommend are:
- 10k+ waterproof breathability
- Durable fabric
- Pockets
- Vents
- Kickpatch hems
- Suspenders
- Adjustable gaiters
- Adjustable waist (helpful when layering)
- Coat & Pant integration
- Recco reflector
5. Base layer
You have heard it before “Dress in layers”. This statement couldn’t be more true for splitboarding. If you splitboard chances are your going to sweat, and get wet. Often times hiking is done in just a base layer. Once the destination is reached, it gets cold really quickly in a wet base layer. Understanding your layers and how to transition between them can keep your body at the right temperature the entire day.
Base layers are designed to draw moisture away from the body. From experience, base layers just can’t keep up with the amount of sweat that is produced from the ascent. Getting wet in the woods is very dangerous. Temperatures change quickly, and from hiking to riding, your body temperature changes drastically. Often times it is a good idea to bring an extra dry base layer to change at the top.
They are usually made out of wool, synthetic, or polyester for warmth when wet, and quick wicking.
6. Safety Equipment
Splitboard touring involves inherent risk, and knowledge of these risk is the first defense. There are some basic tools and equipment that every splitboarder should carry with them to the backcountry.
Backpack
Some choose to not use a backpack, but unless you like bulging pockets, you are better off finding a backpack to hold your gear. There are many great backcountry backpacks with compartments to hold specific splitboarding gear.
Look for a back pack that will meet your current and future needs. Backpacks come in all sizes. and shapes. We recommend looking for a backpack that hold a shovel, probe and first aid kit.
ABS Backpacks
ABS Backpacks offer an additional safety measure. ABS packs provide a canister of air and a bladder that is inflated in case of an avalanche. The idea is that this makes the splitboarder more buoyant, keeping them from being buried. The success rate of these types of packs is somewhere in the area of 95%!
Beacon
Avalanche transceivers are an investment that can save your life, or your friends life. The basics behind an avalanch beacon is that it sends our a signal that can be found by others with transceivers. A beacon has two modes, a send mode and a find mode. When touring, your beacon should be in send mode. In the event of an avalanch, if you are searching for a burried rider, you switch to find mode, and begin following the directions on the beacon. Most modern beacons display a direction and a distance to the victim. There are two types of beacons you should be aware of when shopping.
Single Antenna
These beacons only display distance, and do not display direction.
Multiple Antenna
Multiple antenna beacons are able to display direction and distance making it easier for a beginner to locate a victim. These beacons are usually substantially more expensive than single antenna units. As a beginner, it is recommended that you buy and learn to use a multiple antenna beacon.
Beacons are pretty easy to use, but it’s always good to practice before you have to use it. In addition to carrying a beacon with you, it should go hand in hand with a probe and shovel.
The best avalanche beacon resource we can find is BeaconReview.com
Probe
Avalanche probes are pretty simple yet effective idea. When an individual is burred under the snow, your beacon can get you close to the victim, but before you start digging, you can save a lot of time by locating the victim first. An avalanche probe is used to determine what is under the snow. They usually fold up and assemble with the pull of a cable. With a sharp tip on one end, it easily penetrates through hard snow.
Shovel
Once the victim has been located with a beacon and probe, it’s time to start digging. You may have heard that once the snow of an avalanche sets up, it’s hard as concrete. Well, we wouldn’t say it’s that hard as concrete but your not going to be digging through it with your hands. A shovel can be the fastest and most efficient tool for rescuing a victim.
Multi-use Shovels
There are many options for shovels in the market. There are shovels with multi-position adjustments in the handles and the head. These designs are all for moving snow faster and more efficiently.
Plastic vs. Metal Shovels
There are different types of materials used to make these small portable shovels. They are usually made out of metal or hard plastic.
The metal shovels are usually made out of light weight aluminum and tend to cut through the snow better than plastic.
Plastic shovels tend to have a smaller scoop, but seem to pack a little better. Plastic shovels while very strong (We have seen cars drive over them) can become brittle or compromised in extreme cold weather.
When choosing a shovel you should take into mind the following points:
- Scoop Size
- Shovel Size (both in pack, and extended)
- Weight
First Aid
A light weight medical first aid kit can provide the necesseties needed to handle an emergency in the backcountry. For just over a pound, you can add a few items to your pack that can make a big difference in the backcountry. We recommend at a minimum carrying the following:
- Antibiotic ointment
- Antiseptic wipes
- Bandage and Hooks
- Gauze
- Ibuprofen
- Aspirin
- Safety Pins
7. Weather
The weather can change in an instant in the backcountry, from a warm 50+ degree sunny day to below zero blowing snow, zero visibility conditions. You need to be prepared for the sun just as much as you need to prepare for the cold.
Utah (USA) has a great resource for avalanche conditions http://utahavalanchecenter.org/
Sun
Trekking in the sun involves a lot of energy, it’s hard work that’s worth every minute of it. Be prepared for warm weather, carry Chapstick with SPF, also sun screen and glacier glasses.
Cold
Just as important as preparing for the warm weather is being prepared for the cold. It can seek up on you, you think it’s hot as you hike up the mountain, the moment you stop, you your wet, sweaty body instantly turns cold. Your best defense against the cold is dry layers. Always carry an extra dry base layer that can be changed in an emergency.
Additionally, bivy sacks and solar blankets are great safety advices to carry. They can provide additional protection from the cold if lost or needing to spend the night on the snow. Paired with fire starting tools, these make a minimalist protection for not much additional weight.
Snow
Snow can take on many forms rendering you blinded in a white out, or sopping wet from high content snow. Be prepared if you need to hunker down and wait out conditions.
8. Where are you going
You need to plan your trip out. Whether you are going for a short hike after work, or a week long trekking expedition you need to know where you are going, and what to expect. By planning out your trip, you are able to know what gear you need to bring, and what type of terrain you are likely to encounter. You can look up recent snow history and temperatures to know if your going to be encountering fluffy powder or icy conditions.
9. Who are you going with
The buddy system has never been more important. For example carrying a beacon with you won’t do much good if no one is out there to find you. Planning trips with friends makes the trip that much more enjoyable, and is a great way of making new friends.
Think about taking an avalanche safety course or beacon seminar with your friends. Make sure everyone knows how to use their safety gear.
When hiking or riding, be cautions to others on the mountain. If a slide was triggered, or even heavy sluff, could it affect other hiking below? Additionally, look above you during your accent. Are there other dropping in above you that could affect you.
10. Know the conditions
Avalanche.org is one of the best resources for avalanche safety information in the US.
NOAA.gov is one of the best sources for accurate in-depth weather information for the US.
For more information about what is needed to be save and prepared splitboarding in the backcountry please visit our What do I need to get started Splitboarding Page
The Ascent
When correctly prepared for the climb up, it can be just as enjoyable and the powder turns on the way down.
1. Splitting the board
2. Using Skins
3. Using Trekking Poles
4. Safety Gear
a. A Beacon, and make sure it’s turned on and in send mode.
4. Optional Gear
a. Crampons
b. Climbing Gear
5. Assessing the conditions
The Decent
1. Reassemble the Skis to a Snowboard
2. Check Safety Gear
3. Where is your companion and other hikers?
Chapter 1: The Basics of Splitboarding
Chapter 2: How Does a Splitboard Work?
Chapter 3: What do I need to get started?
Chapter 4: Should I make or buy a Splitboard?
Chapter 5: What types of Splitboards are there?
Chapter 6: What type of Splitboard bindings are there?
Chapter 7: What are the risk of Splitboarding
Chapter 8: Myths about Splitboarding
Chapter 9: Splitboarding for exercise
Resources: